12.05.2025 (Week 04)
Lee Xiang Ling / 0384095
Digital Photography and Imaging / Bachelor of Design in Creative Media /
Taylors University
Week 4 — Practical (Digital Imaging Exercises) & Adjustment Layers and
Filters
3. Curves
5. Selective Color
Filters
Different filters can create different visual atmospheres, thus evoking different emotional experiences in the audience.


Exercise Demo - SHAZAM:


2. PROJECT 1B - PART 2: Recoloring Black and White


This is the final demo practice completed following the professor's steps:


In addition to this photo, I also colorized several other images.


Lecture
Adjustment Layers
Adjustment Layer is a very practical and flexible editing tool in Photoshop. It is a non-destructive image editing tool that does not change the pixels of the image itself when adding color or adjusting the tones of the image, and can edit and discard your adjustments or restore your original image at any time.
 |
| Fig 1.1 - Image sample after tone adjustment |
- Basic understanding of Adjustment Layer
When you add an adjustment layer, a new layer and a corresponding Properties Panel will appear. You can adjust the parameters in the properties panel to change the appearance of the image.
 |
| Fig 1.2 - Example of the properties panel |
1. Brightness / Contrast
Used to adjust the tonal range of an image
- Brightness: Adjusts the highlights of the image
- Contrast: Adjust the shadow portion of the image
Used to adjust the tonal range of an image
- Brightness: Adjusts the highlights of the image
- Contrast: Adjust the shadow portion of the image
 |
| Fig 1.3 - Example of Brightness & Contrast |
2. Level
Adjusting the levels of the shadows, midtones, and highlights.
 |
| Fig 1.4 - Example of Level |
3. Curves
Let you adjust as many points as you want throughout the entire tonal range of your image.
 |
| Fig 1.5 - Example of Curse |
4. Exposure
Adjust exposure levels with three sliders:
- Exposure: Highlight
- Offset: Mid Tones
- Gamma: Dark Tones
 |
| Fig 1.6 - Example of Exposure |
5. Selective Color
Selectively modifies the amount of a primary color without modifying the other primary colors.
 |
| Fig 1.7 - Example of Selective Color |
Filters
In Photoshop, filters are a common and very important way to process images. They can be used to change colors, add blur effects, and even create new image effects.
 |
| Fig 1.8 - Example of Filters |
Different filters can create different visual atmospheres, thus evoking different emotional experiences in the audience.
Photo filter trick in Photoshop
Exercise
DIGITAL IMAGING EXERCISE:
1. PROJECT 1B - PART 1: Hearst Mansion
- Follow instructions from the W4_HEARST MANSION:
https://docs.google.com/presentation/d/1Uc5UY-PjqTCImigtHk8qh6vUuutTZw8qAjJHiNXjPOM/edit?usp=sharing
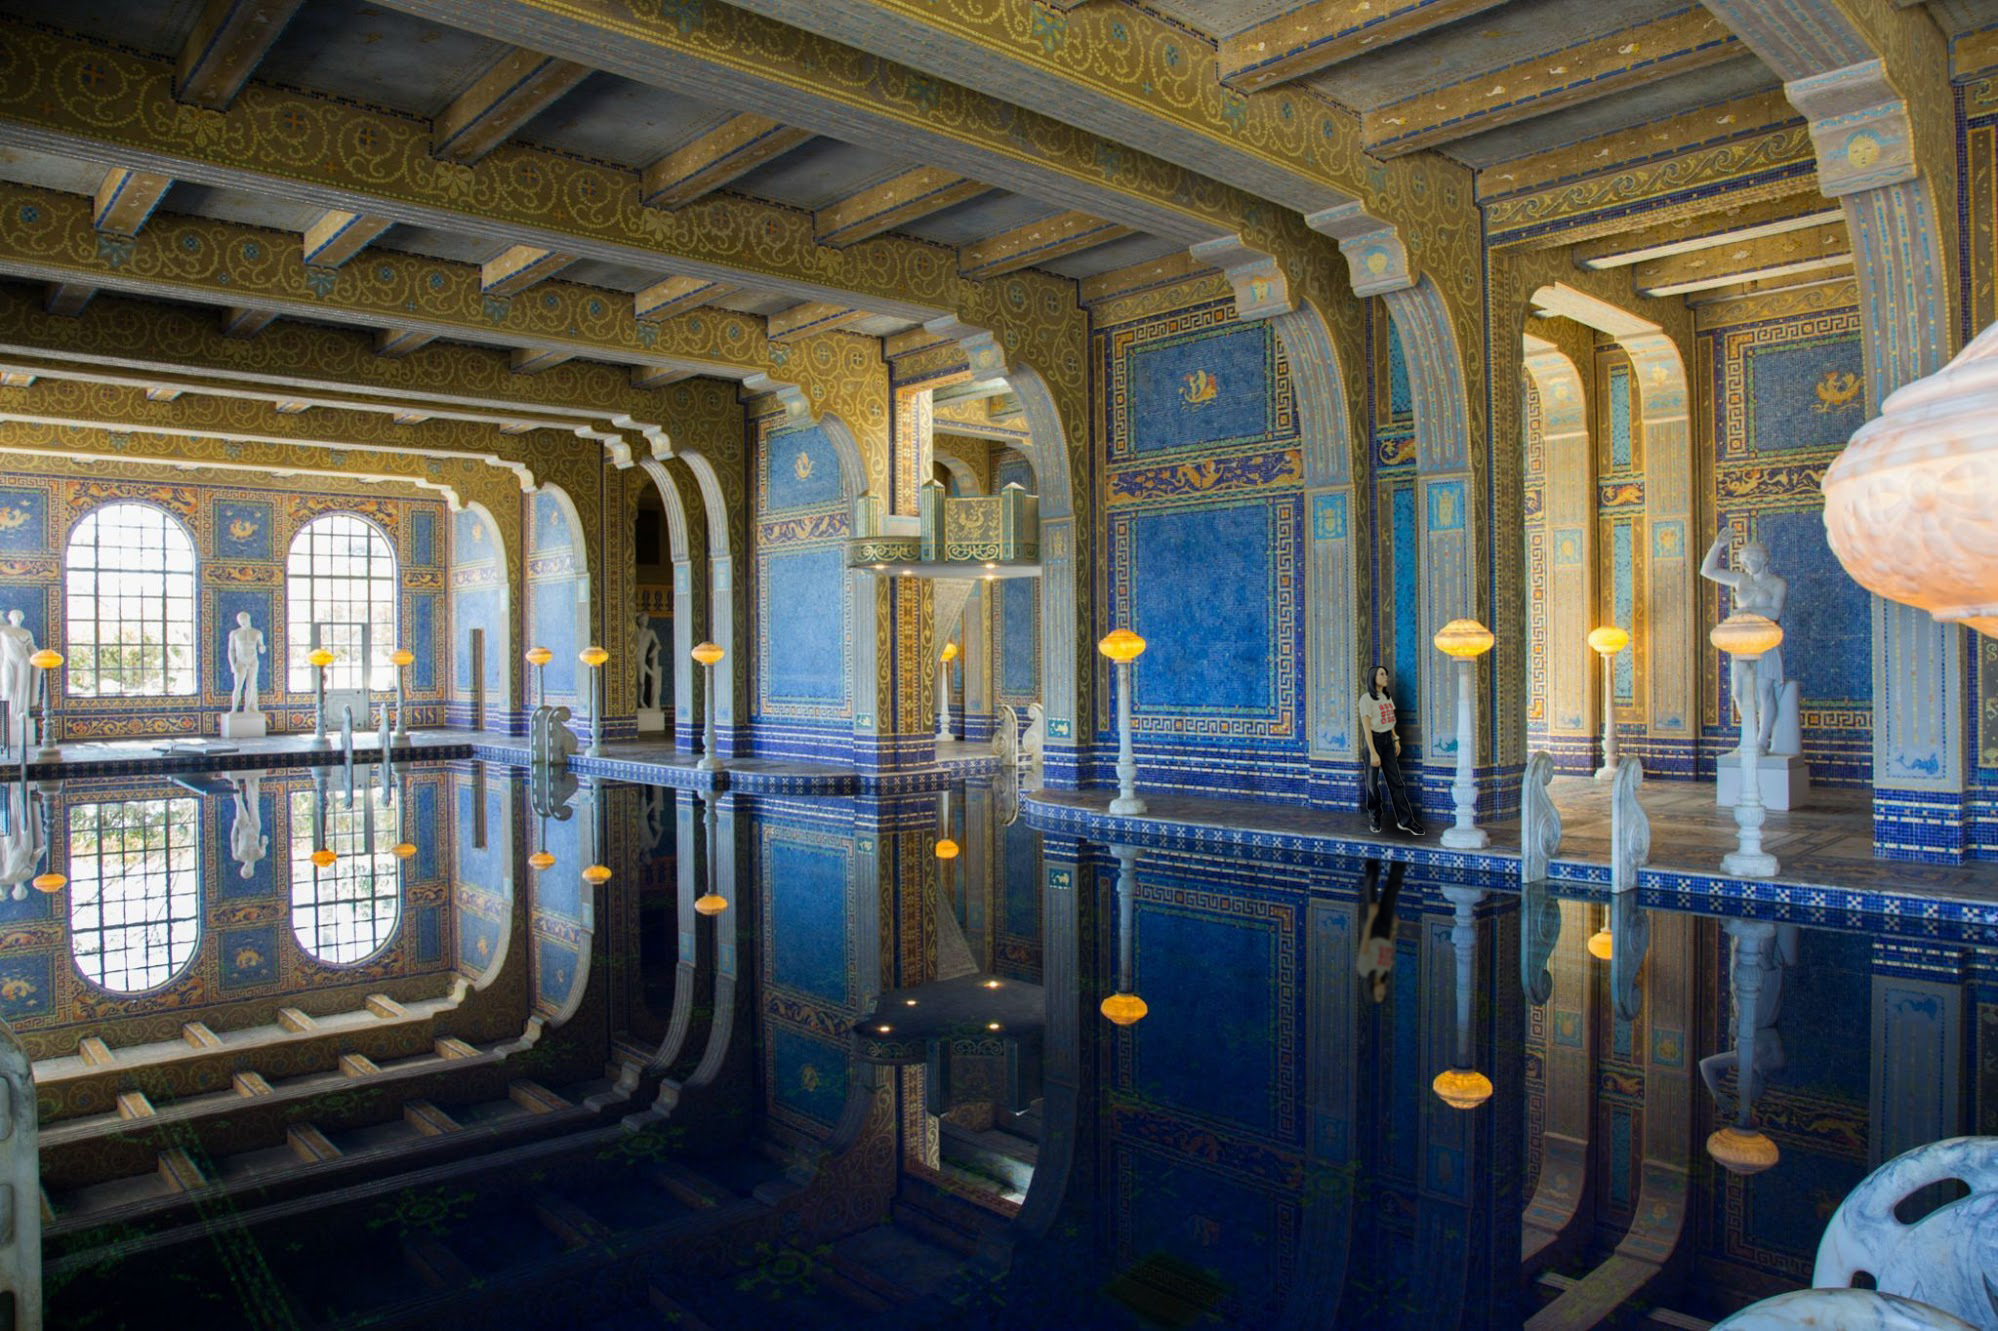
This week, we learned how to use Photoshop to composite photos of people
onto backgrounds. Following the professor’s video guidance, we first
practiced how to edit the “Shazam” character in the poster into the
background image of “Hearst Mansion” and adjusted its hue, grayscale, and
brightness to make it more consistent with the overall style of the
background.


Fig 1.1 & 1.2 - "Hearst Mansion" & "Shazam"

|
| Fig 1.3 - Editing Shazam into the Hearst Mansion |
Under the professor's guidance, we added shadow and reflection effects to
make the characters blend more realistically into the background.


Fig 1.4 & 1.5 - Added Shadow and Reflection
Exercise Demo - SHAZAM:

|
| Fig 1.6 - Final composite of Hearst Mansion and Shazam, JPG_Week 04 |
After following the professor to complete the demonstration exercise, the
professor asked us to use our own photos to composite with the background
of "Hearst Mansion".


Fig 2.1 & 2.2 - My Own Photo and Masking
Exercise - My Reflection:
|
| Fig 2.3 - "My Reflection", JPG_Week 04 |
2. PROJECT 1B - PART 2: Recoloring Black and White
(Follow instructions from the W6_RECOLORING BREAKDOWN:
In addition to the above exercises, this week we also learned how to use
Photoshop to colorize black and white photos.

|
| Fig 3.1 - The B&W Photos that need coloring |


Fig 3.2 (L) - The Photo of Hair Colour / Fig 3.3 (R) - The
Photo of Skin Colour
Under the professor's guidance, we used selection tools to outline the
areas to be colored.

Fig 3.4 - Use the selection tool to outline the area to be
colored
Next, we applied masks and solid color backgrounds for the coloring
process. We also adjusted the layer blending modes (overlay, soft light,
etc.) to make the colors appear more natural and harmonious.

|
| Fig 3.5 - The layer masks of Demo Practice |
This is the final demo practice completed following the professor's steps:


Fig 3.6 & 3.7 - The comparison pictures of black and white and
coloring, JPG_Week 04
EXERCISE 1: (Tutorial Demo in Class)


Fig 3.8 & 3.9 - The demo practice of the comparison pictures of black
and white and coloring, JPG_Week 04
I made a significant mistake during this exercise: I accidentally warmed the skin
tone too much, which made the overall effect look a bit unnatural. So,
I made some simple adjustments.

|
Fig 3.10 - The final demo practice of the B&W
recolouring |
PROJECT 1B: PART 2 (Recolouring B & W photo) Extra
Exercise
Once we have our demo image ready, we need to select a black
and white image from the stock images available on Google
Drive.
I chose the photo of model Adut Akech from among many pictures in
Google Drive. So, I found a modeling photo of her as a sample.


Fig 4.1 & 4.2 - The B&W photo and sample photo of Adut
Akech


Fig 4.3 & 4.4 - The process of coloring using Photoshop
B&W Recolouring Exercise:

|
| Fig 4.5 - My Final Colouring Exercise, JPG_Week 04 |
In addition to this photo, I also colorized several other images.


Fig 4.6 & 4.7 - Other Colouring Exercises 1, JPG_Week 04


Fig 4.8 & 4.9 - Other Colouring Exercises 2, JPG_Week 04
Instruction
<iframe allow="autoplay" height="480"
src="https://drive.google.com/file/d/1DsERWuF4d2YDYxX0lRiZOdmNqf8wk4FU/preview"
width="640"></iframe>
Reflection
This exercise was interesting and challenging. I especially
enjoyed the colorization process. Although it took me a long time
when I first started, my coloring speed gradually improved as I
became more familiar with using Photoshop. I felt a strong sense
of accomplishment after completing the colorization.
The most difficult part of this exercise was adjusting the
grayscale, brightness, and tone of the colors, which required
constant experimentation and fine-tuning. Through this exercise, I realized that color matching is one of my weaker areas. I plan
to practice more with color combinations and pay closer attention
to references and color palettes in the future to strengthen my
color skills.